Monday, May 5, 2014

Project #2 Calender

Photoshop Calendar


Calendar months

    • Create a new document that is 11” wide, 8.5” high, resolution 300 ppi. Create 5 or 6 rows and 7 columns for dates. Then, you can use this as a template for the other 11 months.
    • Use guides to help you stay at least 1/4” away from each edge of your document. Our printers can’t print right to the edge.
    • Lines or custom shapes, and dates on calendar should be evenly spaced and neat & tidy, even when zoomed in at 200% or more. Use guides to help you keep everything lined up.
    • Dates should be easy to read from 6 feet away – but don’t make dates so large that you can’t write anything on the calendar.
    • Copy and paste free Holiday clip art from the web (example: search Google for “4th of July free clip art”. You’ll find plenty of sites. Include clip art for these holidays:
      • New Years Day,
      • Valentine’s Day
      • Memorial Day
      • Independence Day (July 4th)
      • Labor Day
      • Halloween
      • Thanksgiving
      • Christmas
      • You can add photos of friends and family for birthdays and additional holidays if you want to.  
    • Take original photos for the picture for all 12 months.  If you want a flip style calendar with one collage for every month (like the school calendar) then you can create a collage with at least 8 original photos.
 Calendar photos (these will be above the dates) 

    • Images should be digital photos captured by you or someone in your family. Each photo should demonstrate good composition principles.
Photoshop shortcuts to remember:
Cntl+Z - Undo.  Photoshop will only allow you to undo one thing.
Space+Command - Zoom in
Space+Option - Zoom out
Space - Pan
Shift - Constrain or make a line straight


Cntl+T - Transform

Monday, April 28, 2014

Assignment #14

Photowalk

For this assignment you will be applying all the things you have learned in class to this point.  The assignment has two major parts and you will need to plan time to make these happen.
A Photowalk is as simple as it sounds; you go on a walk and take pictures along the way.  These pictures can be put together to make a story of your walk.  The big part of this assignment is to get you out taking pictures to apply what you have learned.  While you take pictures keep in mind subject, rule of thirds, leading lines, ISO, shutter speed, and perspective.  You should include an example of each of these on your walk and label which pictures show which techniques.

Part 1
Plan an outing and take pictures along the way.  You should end up with 50-100 pictures after the outing so plan accordingly.  Keep in mind, subject, rule of thirds, leading lines, ISO and shutter speed, and perspective.  Include some examples from each.
Part 2
Now you will create a Photostory from your photos.  Photostory is a free online program that will allow you to import your pictures, put them in order, add music and titles, and export a video of your story.  This is used by photographers all the time for weddings, funerals, and other events.  The important part of this assignment is to complete each step.  Plan, Shoot, edit/produce, and export. I will give an in class demonstration of Photostory on Tuesday Sept. 17th.  See me if you are absent to arrange how to get the information.  Your story should have at least 20-30 pictures, at least one title, and be put to music.  Additional features may be available but are not required.

Export:
     When you are finished with editing the story complete the activity by exporting the project and save it to your computer.  We will watch these videos the last couple of days in class.  If you want to burn it to a CD you can bring one in and I will help you with it.
Your assignment should include the following documents:
  • A contact sheet with 50-100 photos on it.
  • A completed photostory.
10 bonus points will be awarded if you post your photostory to your blog.

Assignment #13

Action Photography

Taking photographs of sporting events and things in motion is a fun part of owning a camera. For this assignment we will be taking some action shots. You may want to review ISO and shutter speed posts. Get familiar with your camera because some have an action shooting mode that may help for this assignment.
Extra Points will be awarded for action shots at MC sporting events.

For this assignment you will meet the following criteria:
  1. Create a collage of 5 action photos in Photoshop.
  2. All pictures must follow a common theme.
  3. At least 2 pictures must have an effect added in Photoshop.
  4. 1 photo taken with a panning effect.


For this assignment you will post 1 collage of 5 good action shots to your blog. Taking good action shots takes time and practice so make sure to take plenty of trial shots.  Do not turn in photos where the subject of the photo is blurry, you need to be able to freeze the action.  Use the following websites for references:


                  4.      http://www.picturecorrect.com/tips/basic-digital-photography-taking-actio

Tuesday, April 15, 2014

Assignment #12 ISO/shutter speed

Ok, this is a difficult thing for some people to get but when you do get it you should no longer be afraid of manual mode on your camera.  The trick is to learn what the ISO and shutter speed setting does, then figure out how it is related to other settings, such as aperture.  Go to     http://sites.google.com/site/biowbiow002/twopeas_12week   and complete the assignment noted under the ISO and Shutter speed link.  This is a longer assignment and will be worth 20 points because it has 2 parts (3 pictures in your post).  Feel Free to explore on for more information.
image
image
For your blog you will post the kitchen sink assignment from the tutorial and post the two pictures to your blog.  Be sure to post the settings you used on your camera, including the shutter speed and ISO.  Please provide a description of why the pictures are different.  An additional photo is required for this post.  It will need to be a well composed shot that uses the shutter speed and/or ISO settings in some way.
Your post should include:
  • One picture of splashing water with the Shutter set around 1/80th of a second.
  • One picture of splashing water with the Shutter set around 1/1000 of a second.
  • An explanation of the settings for each photo (which is which)
  • Explanation of why the pictures show what they show.
  • A third picture (well composed) in which you used your Shutter settings (shutter priority mode). 
  • Information on the third picture regarding the composition and settings of the photo and why you chose those settings.
If you cannot find the Shutter Speed settings on your camera:
  • Google the model of your camera with the word manual.
  • View the pdf of your manual
  • Search for shutter speed using the find tool in adobe reader.
  • If your manual confirms that your camera does not have the settings post the model number of your camera on your post with an explanation of what ISO means and how it can be set.

Tuesday, April 8, 2014

Assignment #11 "In between moments"

The “In between Moments”

The best way to get better at photography is to take pictures, but not just clicking the button.  We have spent several weeks on learning composition and basic Photoshop. 

They say that the average professional photographer only gets two to three really good shots out of an entire roll of film, which would be the equivalent of 24-36 pictures. So, if you’re taking pictures of your daughter’s fifth birthday and you only take 20 shots, you have drastically decreased your odds of getting even a couple of good pictures.

This doesn’t mean you must try and take 100 composed perfect shots.  Often as a photographer you should have your finger on the trigger and between each shot when you ask someone to look at you and smile you should keep taking pictures.  Sometimes in these “in between moments” you will capture a photo that is better than the “set-up” shots.

Now it is time for you to really practice while learning a couple of additional concepts.  For most of your assignments from here on out you will be taking lots of photos with only one post.  For each of these remaining assignments you will also submit what is called a “contact sheet”.

What is a “contact sheet”?

A contact sheet is a set of multiple images printed at the same size as the negative, on one page. In film photography, contact sheets were often used to quickly scan for the highest quality images from a roll of film. Negatives were lined up on a glass sheet and laid on top of the photo paper. The enlarger was then turned on to expose the contact sheet. In digital photography, contact sheet refers to any sheet with multiple thumbnail images printed for the purpose of indexing, or for quick reference.

To create a contact sheet use the following tutorial


You assignment is to attempt a photo-shoot.  Get a willing participant and hold a photo-shoot.  You should take at least 50 photos, select the best 3 and post them to your blog.  You will turn in your 50 photos on a contact sheet.  Put it in the box at the front of the room.  Be sure to pay attention to the “in between” moments.

Thursday, March 27, 2014

Project #1 Poster

For this assignment you will create a poster in Photoshop that announces/advertises something.  I doesnt even have to be real.  Posters have been around for a very long time, in about 1870 they became the dominant way to mass communicate.  Read a short history of the poster at the following link.
http://www.internationalposter.com/about-poster-art/a-brief-history-of.aspx
This will give you some background of how posters have eveloved and have been used.  Think about an idea for your poster, keep in mind "mass comunication".  For example of giant posters you can look to the halls of Mountain Crest. 

You will take at least 5 photos that follow the rules of composition.  You should have three different size of text on your poster.  The last element I would like on your poster is something hidden.  Hide something you cut out of another picture in the poster.  If I cannot find your added object you will recive 5 bonus points.  Also, if your poster has outside of class value (you are doing it for another teacher/parent/buisness/ect) I will award 5 bonus points. Below is a tremendous example of what is expected for this project.

Assignment #10 Photoshop part 2

Now you will complete the same tasks as you did in the previous assignment but you will use your own pictures.

If you have not taken your photos yet, DO IT and remember the pictures you post to your blog for the assignment must be your own pictures. The assignment will be graded as follows:

6 points for 6 total pictures, 3 before editing and 3 after editing.
2 points for a short description of what you did to edit the picture.
2 points for the picture information under the picture.

Good luck with the assignment everyone.

Tuesday, March 25, 2014

Assignment #9 Photoshop


For today I would like you to get started using Photoshop.

Once you are logged in, go to the bottom of the screen to the dock and find Photoshop.  Click on it to open the program.

Next you will open up Safari and use Google to find Photoshop tutorials to acomplish the following tasks.
  • Crop
  • Re-size
  • Add text
  • Combine 2 photos

The second part of the assignment is to edit 5 photos, one for each of the above tasks.  You do not have to take these photos, I will allow you to go online and save 5 that you would like to edit (to save a photo on the Mac side simple press control and click on an image and you will have the option to save it).  The assignment will be to post 5 pictures that have not been edited and the same 5 photos after you edited them with a short description of what you did on each photo.  Use Google tutorials as guides to help you edit the photos.  You will be graded as follows:


8 points for posting 10 total pictures, 5 non-edited and the same 5 after editing.
2 points for a short description under each edited photo explaining what you did.

For your next assignments you will need to use your own photos, so tonight take at least 10 photos that you can make edits to tomorrow.  Try and get a variety of different shots, for example some of the sunset, some of a person, some of animals, something in action, water splashing, etc.  Good luck!

Wednesday, March 19, 2014

Assignment 8 Forced Perspective

The easiest way to explain forced perspective in photography is to show examples.  Check out this link for some examples.  http://www.instantshift.com/2010/08/24/88-brilliant-examples-of-forced-perspective-photography/ or this link for some tips http://www.thephotoargus.com/tips/5-tips-for-creating-excellent-forced-perspective-photographs/  Try an internet search for “forced perspective”
Think about how you would like to set up a shot.  Think about the effect you are trying to achieve.  Angle, distance, depth of field, and focus can make a big difference. Feel free to work in groups of 2-4 people.

For this assignment you will post 2 forced perspective shots of the same subject, but showing 2 opposite perspectives.  For example, you could take a picture of your brother where he appears larger than a vehicle and the second picture he appears smaller than the tire on the vehicle.  Perhaps in one shot the subject appears frail and weak while in the next shot the subject appears to be big and strong.  Think carefully about how you want to present your subject and be creative.  Consider using Photoshop tutorials to help reach your desired effect.


instantShift - Forced Perspective Photography

Tuesday, March 18, 2014

Assignment #7 Leading Lines

Leading Lines

Your next assignment will be on leading lines, or LL’s.  Go to http://sites.google.com/site/bumpphotographylessons/home/lesson-2-leading-lines for some great examples and a better explanation than I could ever do.  After you have read and are comfortable with LL’s, it is picture taking time.  Take at least 30 pictures of what you feel is a good example of leading lines.  As before pick the top 2-3 and get some input from other people.  Your blog post should contain:
  • One picture that shows a great example of leading lines
  • One picture you could improve
  • An explanation (2-3 sentences) of why you feel it is a good example of LL’s
  • An explanation (2-3 sentences)of how your photo also applies the rule of thirds and subject.
  • Also with this post I would like you to list the people you talked to to help you choose your best photo.  (this will force some of you to get input from other people because I may ask them if they gave you input)
Note that I expect you to take 30 photos for this assignment.  The reason for this is you should apply more than one rule in you photo and it will take a bit more thinking to get it done.

Monday, March 17, 2014

Assignment #6 Thirds

Rule of Thirds
The next area we will cover is the “Rule of Thirds”.  In the previous assignment we talked about “subject”.  Each good photo should have a clear subject.  The rule of thirds helps to bring focus to the subject.  To understand the rule divide the picture into thirds top to bottom and left to right like the example below.
clip_image002
Studies show when people look at photos they tend to focus on where these lines intersect.  These areas are the strong areas of the photo.  These strong areas are where you will place the “subject” of the photo.  This will make the shot more interesting.  For example, in the photo on the left the subject is centered in the photo.  On the right the subject of the photo has been moved to the focal point of the photo.  The picture becomes more interesting and balanced.
clip_image004
Go to the following website and read the article on the rule of thirds. 
http://www.digital-photography-school.com/rule-of-thirds
It is important to remember this rule comes naturally to some people.  Others (who are great photographers) have to think about this rule.
In the photo below the girls eyes are where the two lines intersect and she is positioned slightly to the left.  The hair flows right along the left line and brings attention to the subject of this photo (a little girl with a Rapunzel wig).  The rule of thirds used in this photo helps make the subject clear and helps the photo tell a story.  You can almost hear her say “look at my wonderful hair”. 
clip_image006
Look how the barn and the dead tree both fall under the rule of thirds.
clip_image008
The moon falls roughly within the rule of thirds, think how it would look if it was dead center.
clip_image009
Assignment #6
Your assignment is to take a great photo that demonstrates the rule of thirds.  Keep in mind your photo must have a subject like in the previous assignment.  You should take at least 20-30 photos before you begin to sort through what you have.  You should identify 2-3 photos that fit the assignment well and that you like.  Ask for advice from at least 3 people and use their input to help you choose one GREAT photo that demonstrated this rule.  Keep in mind that people may ask you to provide input on their photos.  Be polite and help each other.
Your blog post should include:
  • At least two photos that is a great demonstration of the rule of thirds.
  • At least 2-3 sentences for each photo explaining why you feel your photo demonstrates this rule.
  • Using the last lesson also explain the subject.
  • Any additional information that can help me understand your perspective and why this is a good photo.   This will help me provide feedback so you can better understand the rule

Monday, March 10, 2014

Assignmen #5 Image Size and Quality

Image Size and Quality

For this assignment you will go to http://www.shortcourses.com/use/using1-5.html and read the article on Image Size and Quality.  Answer the following questions and save them to your G: drive for use later.
  • Define Pixel and how is it related to digital photography.
  • What are the two meanings of resolution?
  • How is pixel size specified?  (2 ways)
  • Explain how the image is captured.
  • How is color introduced to a picture?
  • What is the difference between jpeg and RAW file types and why would you use each?
Assignment #4
Take a picture, or use one you have already taken.  Upload it to your computer and save it to your g: drive.
Windows
In windows explorer find the file that is your picture, right click it and select properties.  Record the location of your file, and the file size, listed in the properties tab.  In the properties window select the details tab.  Scroll down and list the following information: dimensions, horizontal and vertical resolution, and file type, post the picture, location, and file size to your blog.
Mac
Open in photo in iPhoto.  Go to the file menu at the top of the screen and select "view" then "info".  This will bring a window up on the top right of the screen.  Once you click on the photo desired, the information required should be available. Additional information may be found by right clicking the file and selecting "get info"

Your post should contain:
  • Picture 
  • Location listed under the properties tab
  • File size listed under the properties tab.
  • Dimensions, horizontal and vertical resolution, and file type from the details tab.

Thursday, March 6, 2014

Assignment #3 Subject

Every good photo has a “subject”.  That does not mean that there is a person in the photo, it means the photo is OF and ABOUT something.  Of describes what object may be in the picture, while about describes About describes emotions or concepts.  For example, go to http://photofocus.com/2010/05/31/whats-the-subject-of-this-photograph/  and read the article “What’s the Subject of This Photograph”.  In this example there are several pictures of a barn with horses in the window.  Each picture has a clear subject, or is of and about something.  If you look beyond the Of and think in terms of About the pictures begin to tell a story.  A picture is worth a thousand words, but in a great picture the words create a story.
When you are thinking about the subject of a photo think about how you would search the web for the picture.  Often the obvious subject is listed. For example if you search Google images under the search term “bridge” the photo below will come up.  The bridge is the obvious subject of the photo.  Although that is what this photo is “of”, the subject of this photo can be much more than that.  This photo is about something other than a bridge.
image
When you are trying to determine the subject of a photo ask yourself the following questions.
Who? Who or what is this a picture of? Are there people? Children? Men? Women? Cows? Horses? Trees? Buildings? A specific named person or thing?
What? What are the creatures or objects in this picture doing? What is their condition or state of being? What emotions are conveyed by these actions or conditions? What abstract ideas do these actions or conditions symbolize?
Where? Where is this picture spatially? Is it an identifiable geographic place? Is it a mythical place? Does place matter in this picture?
When? The concept of When can be both a specific date and a time period. Is the time period significant? Can you determine the time period?
Assignment
For assignment #3 you will take a picture that has a clear subject.  One important concept to learn is that you will not get good photos unless you take photos, lots of photos.  For this assignment you should take at least 20 pictures and then you can select a few favorites.  Get input from at least 2 other people, (people in the class would be great to get input from), and select your best photo.  You will post this picture to your blog as a demonstration of your amazing ability.  You should also include a photo that is ok but you feel could improve.  Below the photo you should write a brief explanation (2-3 sentences) explaining why you think your photo has a clear subject and what story you think your photo tells.  I would like to show some examples in class so if you do not wish for me to use your example please make a note of it on your blog.
Your blog post should contain the following:
1.  A photo with a clear subject.  (it should tell and story)
2.  A photo that you could improve with an explanation.
3.  An explanation of why you feel this photo has a clear subject.
4.  An explanation of the story you think your photo tells.
Remember to answer the questions:
Who
What
Where
When

Don't forget to include the photo information below the photo..

Wednesday, March 5, 2014

Assignment #2 Camera ID

Camera Identification
    This assignment is worth 10 points
  • 5 for the photo of your camera
  • 4 for the information listed
  • 1 for the reviews
In this assignment you will identify the camera you will use for this course.  You should partner up with someone to obtain a picture of your camera not from the web (I should see the classroom desk in the background).  It does not need to be a great picture but I should be able to see the camera.  You may need to look up the details online (Google the model and make of your camera with the word manual).  You will create a blog post that explains the details of your camera.  You may not know what each feature is but include the information in your post.

Your post should contain:
  • Brand
  • Megapixels
  • Optical Zoom
  • Digital Zoom
  • Approximate cost of your camera
  • Memory devices used by your camera (SD card for example)
  • Cable used to connect your camera to the computer
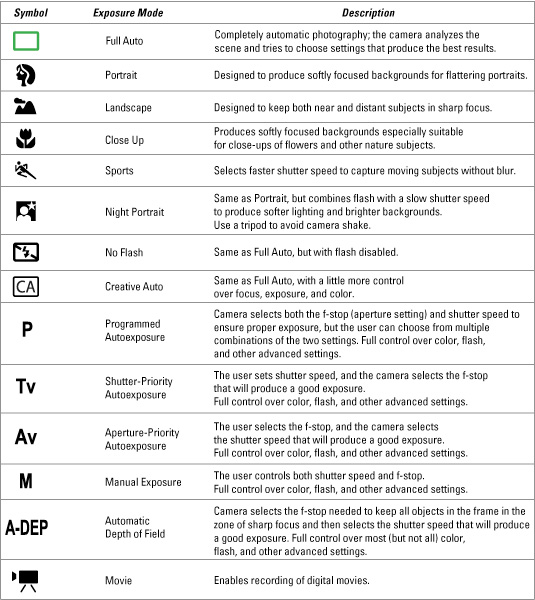
  • Available exposure modes on your camera
  • Does your camera have video capability
  • Copy and paste at least 2 reviews for your camera. (find these online)
You post should look similar to the one below.
EOS Rebel T2i EF-S 18-55mm IS II Lens Kit
  • Brand – Canon
  • Megapixels – 18.00
  • Optical Zoom – Depends on the lens used (interchangeable)
  • Digital Zoom – None
  • Approximate cost of your camera – $700.00
  • Memory devices used by your camera (SD card for example) – SD Card, SDHC card, SDXC card
  • Cable used to connect your camera to the computer – USB
  • Available Exposure modes on your camera -
  • image0.jpg
  • Does your camera have video capability – Yes HD video
  • Copy and paste at least 2 reviews for your camera. (find these online)

  • Product Reviews
    Nickname: AZ photographer
    Location: New River, AZ
    Used this product for: Less than 1 month
    Expertise Level: Professional or Expert
    Product replacement: No
    Awsome camera
    Overall Rating
    clip_image001
    5
    Date:June 6, 2010
    Pros: Nice features/settings, Quick Start-up time, excellent image quality, Lightweight/Portable, easy to use
    I have had my T2i for about a month now, my third Canon Rebel after my XSi and T1i. The picture quality is awsome. The features and options are plentiful. It would have been nice to have switch for movie mode like the 7D
    316 of 337 people found this review helpful.
    Was this review helpful to you?YesNo(Report Inappropriate Review)
    Share this Review:
    clip_image002clip_image003clip_image004
    Nickname: Anonymous
    Location: New york, NY
    Used this product for: 6 to 12 months
    Expertise Level: Casual User
    Mostly used for: Family & Friends
    Overall Rating
    clip_image001[1]
    5
    Date:July 17, 2012
    Pros: good battery life, quiet, Nice features/settings, Quick Start-up time, excellent image quality, Superior build quality, Bright LCD, Solid Operation, Simple controls/menu, easy to use
    Cons: Heavy/Bulky
    The camera itself is easy enough to use as a beginner and gives professional quality photos. The sofware is new to me and is the most confusing part. Overall, very satisfied with the product and inspired to learn more so I can make use of its many functions.
    2 of 2 people found this review helpful.
    Was this review helpful to you?YesNo(Report Inappropriate Review)
    Share this Review:
    clip_image002[1]clip_image003[1]clip_image004[1]

    This assignment is worth 10 points
  • 5 for the photo of your camera
  • 4 for the information listed
  • 1 for the reviews

Monday, March 3, 2014

Assignment #1 Blog Creation

In this assignment you will create a private blog that you can share only with people you give permission to.  You will turn in many of your assignment using this blog including the photo assignments.  It is important to remember that this is a classroom blog so all posts will be seen by Mr. Williams and other teachers and principals of the school so please, for your benefit, keep ALL posts and parts of posts school appropriate.

Go to  www.blogger.com and use your e-mail account to set up a blogger account.  You will know you have been successful when you end up at a page that shows your Blogger Dashboard.  It should look similar to mine pictured below except you will not have a blog yet.


Once on your dashboard you should upload a photo of you to serve as your profile photo this can be taken with your computer you are working on or you can hold a professional photo-shoot to get it, I don't care how good you look.  You may update any areas of the rest of your profile in any way that you like.  However only waste time on it if you are ahead of the class with your assignments.  The Photo of you is the only required part.

Once you have created a Blogger account it is now time to create your Blog.
Click on the “Create a Blog” link on your dashboard.  You will be asked to name your blog.  You must use your last name as part of the Blog title so it may be identified for grading.  If you have issues with this talk to Mr. Williams.  The blog address is entirely up to you provided it is available.
Next, you will choose a “starter template”.  Choose one that you like, they can be changed anytime so don’t spend too much time picking a template.
Click the continue button and whammo you are ready to start blogging.  At this point you have the option to “Start posting” or “customize how your blog looks”.  Go ahead and do some customizing if you have time, points will be given for a nice looking blog.  When you are done click on “go back to Blogger, click on the “Dashboard” button at the top of the page.

Making it private
When you create your blog it is by default public, meaning anyone may look at your posts.  For this class your blog MUST be private, meaning you choose who can see it.  To do this complete the following steps.
  1. Go to your blogger dashboard.
  2. Find you classroom blog, and click the down arrow next to the pages and choose the "settings” link.
  3. Once you see the permissions page there are two sections.  Blog Authors, and Blog readers.  Under Blog Readers click the button next to “Only people I choose”.
  4. Because I will be grading you blogs, it is important for me to be able to see your blog so at this point type in my e-mail address (mtcrestwill@gmail.com) into the box on your page (feel free to add your parents, friends, and others you wish to see your blog) and click invite.

Lets get blogging
Once your Blog has been set up you are ready to start blogging.  Find your blog on your “dashboard” and click the orange pencil which is to create a new post.
Posting is just like using Microsoft word without all the whistles and bells.  If you find it easier you can write your posts in word, then copy and paste in to blogger.
The first post you will be required to create will contain the following:
  • A Photo that is an example of how you want to learn to take photos.  It could be a local photographer you like, a well known photographer, or just a few shots from a website that really grab you emotionally.   Be sure to include where you got the photo from.
  • Name 3 things that you like and are interested in.
  • Name what you want to learn in this class.
  • Indicate if I may or may not use your posts as examples in the class.
Once you have created the post, review it and when you are happy with the way it looks click the “Publish” button and it will automatically post it to your blog.  By default a web browser will open and you can see what our blog looks like to other people.
Congratulations!!  You are now not only a Blogger, you have finished blog assignment #1.  Please confirm that the instructor has access to your account and can grade your assignments.